Thanks for your feedback!
EDIT
To register a new app, click the Create app button, represented by the icon ![]() in the bottom right corner of the Apps page.
A wizard screen will be displayed to help you through the rest of the process, which involves three stages: Basic info, APIs and Plans, Overview.
in the bottom right corner of the Apps page.
A wizard screen will be displayed to help you through the rest of the process, which involves three stages: Basic info, APIs and Plans, Overview.
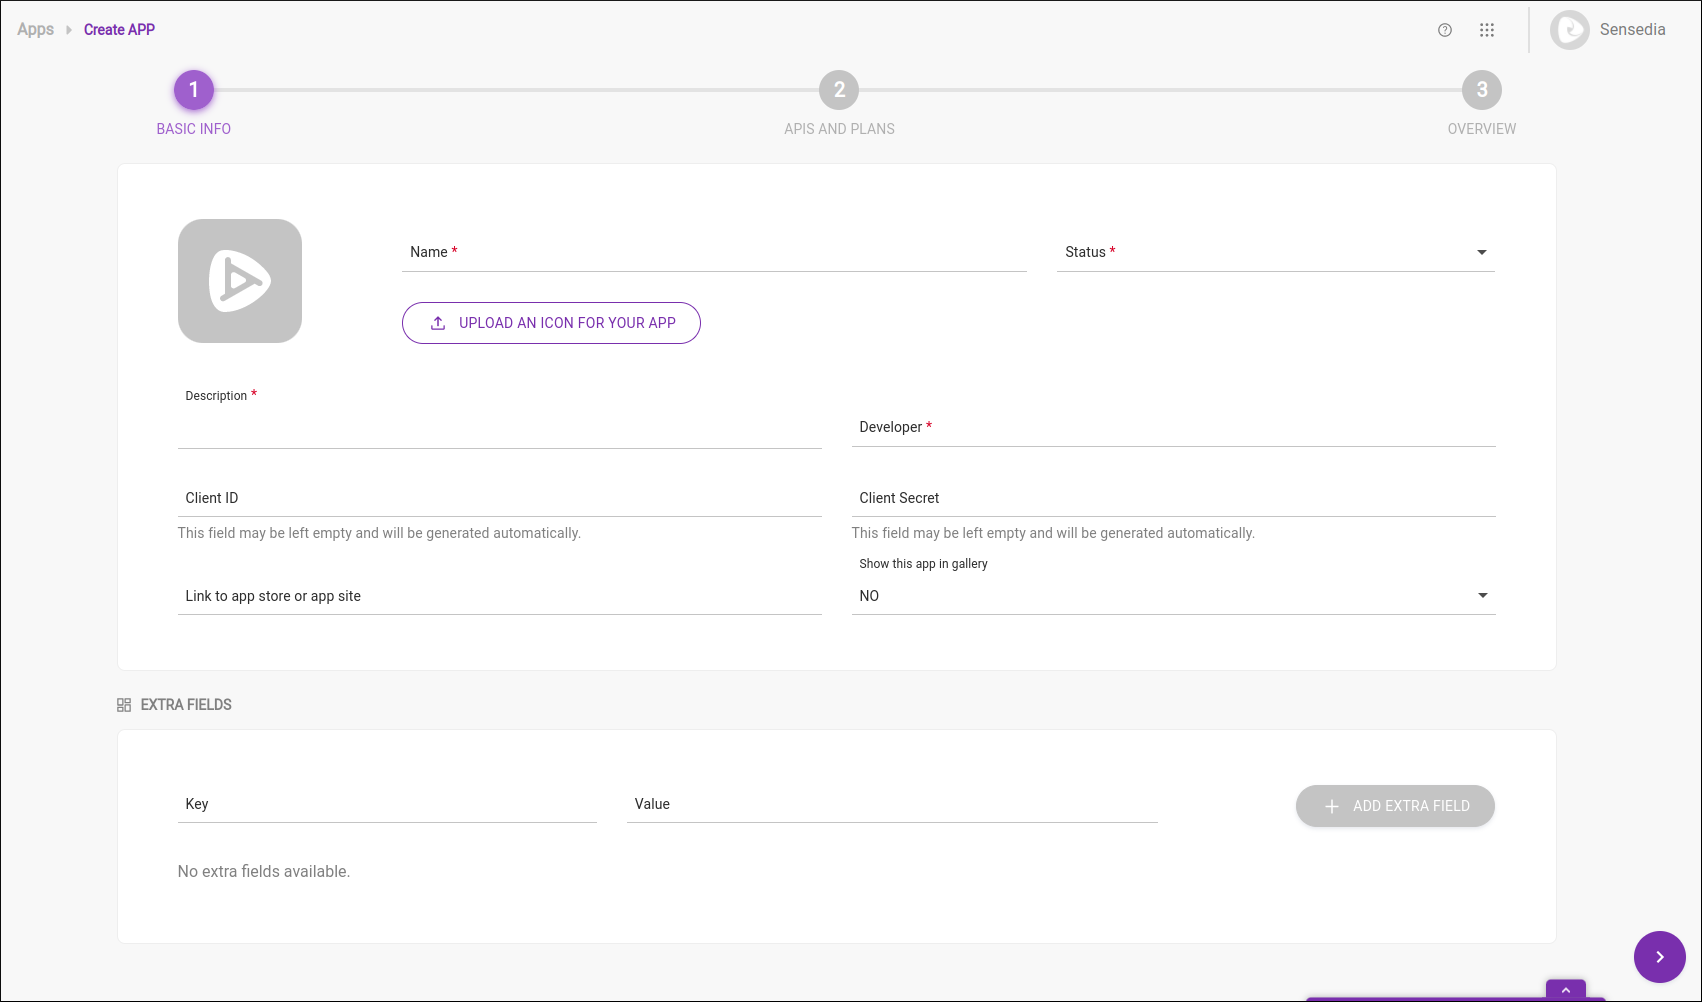
The first step, Basic Info, consists of the following fields and sections:
Name: identifies the app with a unique name.
Description: required field that helps to identify an app.
Status: required field that defines the state of each app in terms of usage ability.
Approved: the app is available for use;
Pending: the app is waiting for approval or rejection;
Rejected: the app was previously pending and is now rejected;
Cancelled: the app is not allowed to be used.
Developer: field to identify the app’s developer. It may assume two behaviours:
It can bind a client ID to a Developer Portal user. This field also has an autocomplete function with a list of all users registered on the Developer Portal, which can be seen on the Manager’s Developers screen.
In case a specific user wants to access the client ID and/or client secret, the insertion of an email address is required.
Client ID and Client Secret: the values can be inserted manually by the user, and the fields accept only letters and numbers. If no value is entered, they are automatically generated by the Manager, which ensures uniqueness.
Link to App Store or App Site: if there is a link to the published app, insert it here.
Show this App in gallery?: if the option is selected, the app will be displayed on the Developer Portal’s App Gallery section.
EXTRA FIELDS Section
This section contains non-mandatory fields which aggregate additional values, complementing the client ID information (e.g., an extra ID or an app registry number).
The extra fields may be informed via query params in REST requests — for example, to search for a specific app.
In this case, you must use extraFields in the format key:value.
|
INBOUND ADDRESS Section
In this section, you can define the inbound addresses that the app will have access to. The inbound addresses selected here will determine in which data planes the app and its credentials will be replicated. By restricting the app’s deployment to one or more data planes, you can control which resources it can access and in which environments its information (such as its credentials) will be stored.
To select the inbound addresses that the app can access, follow these steps:
Click the + Add inbound address button, located in the upper right corner of this section.
A modal window will open, allowing you to choose from the available inbound addresses. Select the desired inbound addresses by clicking the corresponding checkboxes.
| It is not possible to associate an app with an inbound address that does not have the Data Plane field filled in. |
After selecting all desired inbound addresses, click the Confirm button to save your choices.
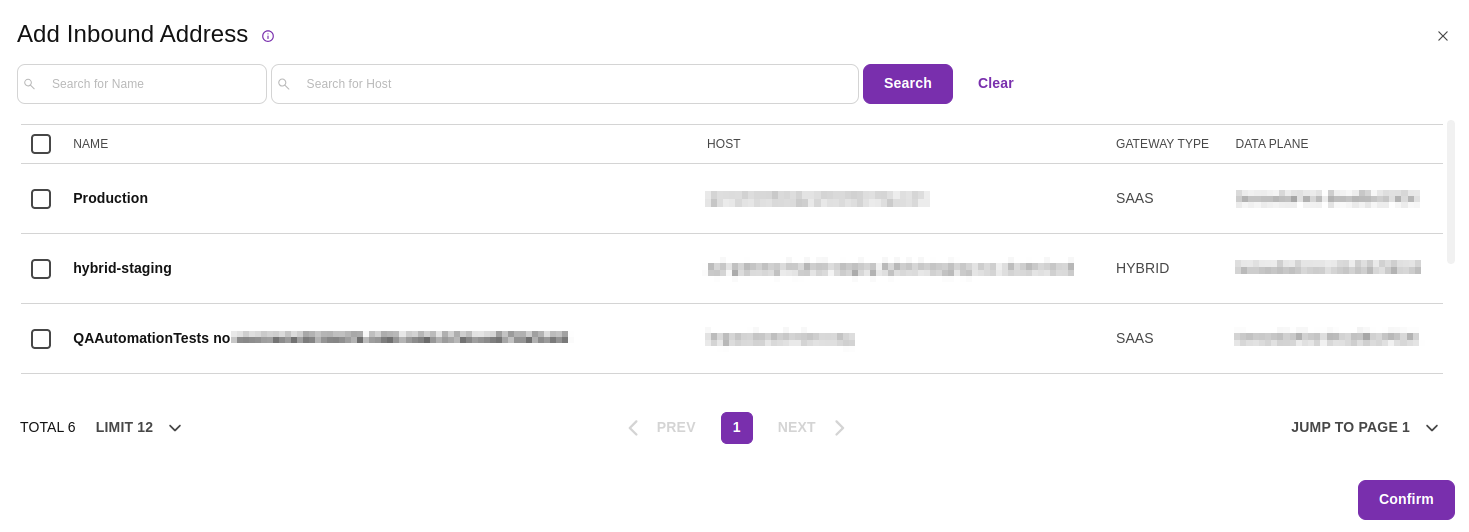
The selected inbound addresses (and therefore those the app will have access to) will be displayed with their basic information in a list in the INBOUND ADDRESS section.
You can remove an inbound address from the list by clicking the ![]() icon located in the last column of the corresponding row.
icon located in the last column of the corresponding row.
|
To proceed to the next step of the app registration, click the Save and next button, located in the lower right corner of the screen.
The second step is the APIs and Plans screen, where you can select the APIs that the app will consume and the plans it must follow.
The APIs which are available on your Manager will be exhibited as cards, ordered by last modification. By default, the screen will display 10 cards. You can change the amount of cards shown on the screen by clicking the Show button, which is located under the APIs. You can also cycle to the next page of APIs through the Next button or to the previous one with the Prev button. To jump to a specific page, enter the number of the page and click Jump to page.
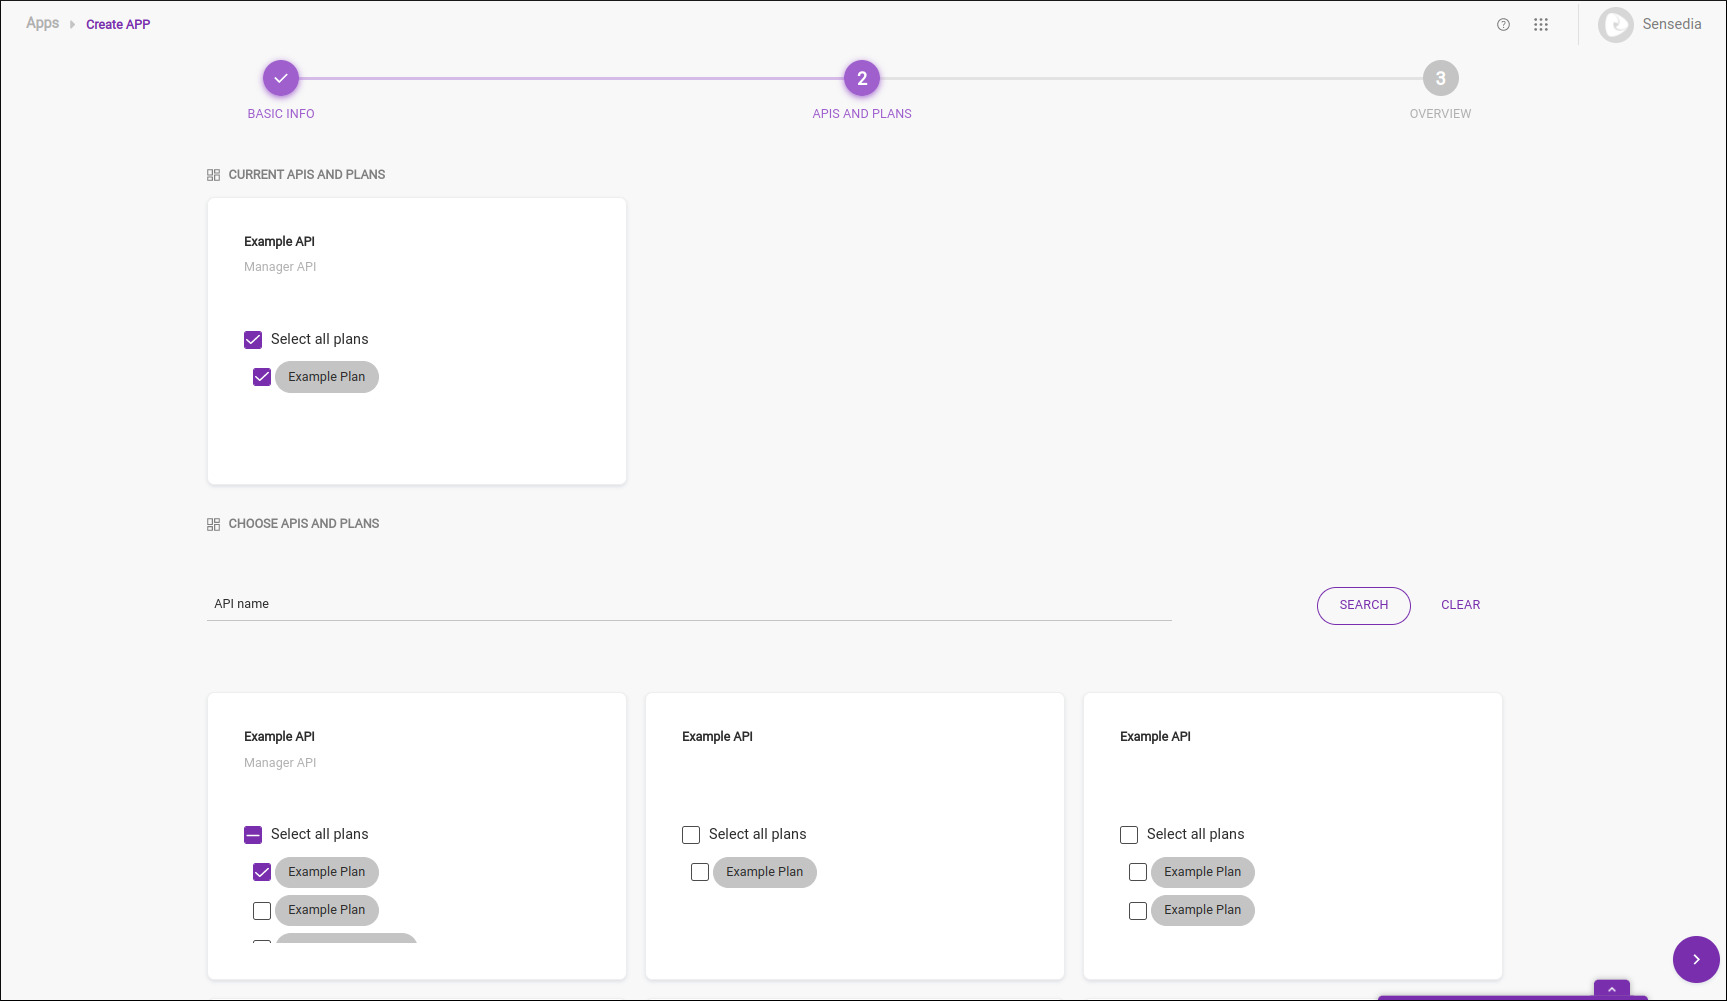
You can select an API from the list of cards or use the search field to filter APIs by name, which makes it easier to find the desired API if you there are many registered. You can clear the current search by clicking the Clear button, in which case the initial list of cards will be displayed again.
To select an API, just choose a plan by clicking on the checkbox on its side or all of them by clicking on Select All inside the API card, once this is done the API and the chosen plan will be active and saved. Multiple APIs can be selected for the app, the chosen ones will be displayed in the Current Plans and APIs section above the search field, and their cards will indicate the chosen plans.
If no API (and, consequently, no plan) is selected, the app will be created but will not be able to consume any API. You can link the app to an API at another time, via the app edition feature.
If you wish to remove the API you just selected, uncheck the chosen plans or you can click Select All on the API card to deselect them all at once.
Note that the API cards on the list may contain two types of warning:
If you wish to link an app to an API that doesn’t contain any plans, the card will display this message: "To consume this API, it needs to have a plan. You can finish creating your APP and after the API has a plan, you can edit your APP and link it to the plan you want.". You will need to create a plan beforehand in order to link this API to your app.
A card will contain the ![]() icon when the API at hand is an older version of another registered API.
icon when the API at hand is an older version of another registered API.
Once you have chosen the desired APIs and plans, click the button Publish your app which will publish the app and you will be directed to the Overview screen.
The third step is the Overview screen.
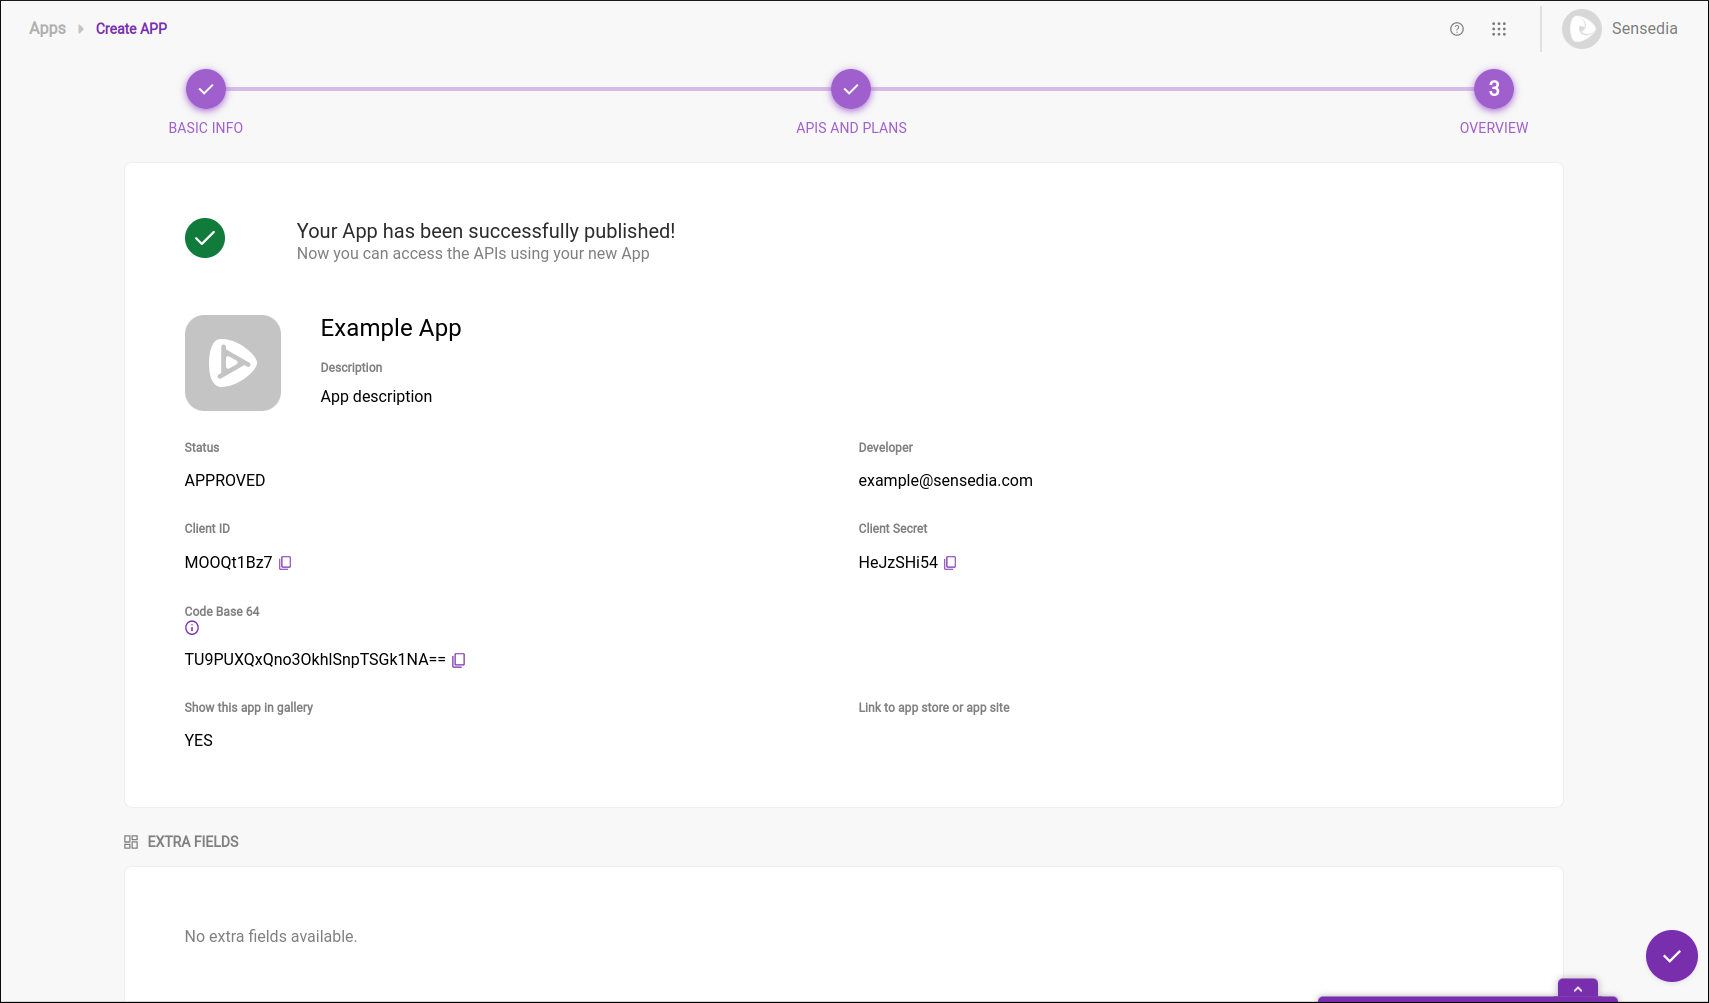
The screen displays all the data entered during app creation including the chosen APIs and plans. The Client ID, Client Secret and Code Base 64 can be copied to the clipboard by clicking the icon next to them.
If you want to edit the App, just click on the desired step on the top bar and perform the edit. To finish the wizard and save your app just click the Done button and you will be redirected to the Apps list.
Share your suggestions with us!
Click here and then [+ Submit idea]