Thanks for your feedback!
EDIT
The Integrations screen controls access and authentication settings needed to integrate Flexible Actions with third-party services. These settings are required if you want to add Webhook and/or Slack actions for your alerts.
The screen consists of two tabs: WEBHOOK CREDENTIALS and SLACK, specified below.
The tab WEBHOOK CREDENTIALS () lists authentication information used by Flexible Actions to send requests to registered endpoints. These requests are one of the options for sending notifications when an alert is triggered and are configured in the ACTIONS step when creating an alert (both in Platform Events and Runtime Alerts), under the option Webhook.
Credentials can consist of client ID or client ID and secret. Their configuration also includes the location where the information will be included in the request (which can be in the header or query param).
The tab lists all existing credentials, sorted by date of last update:
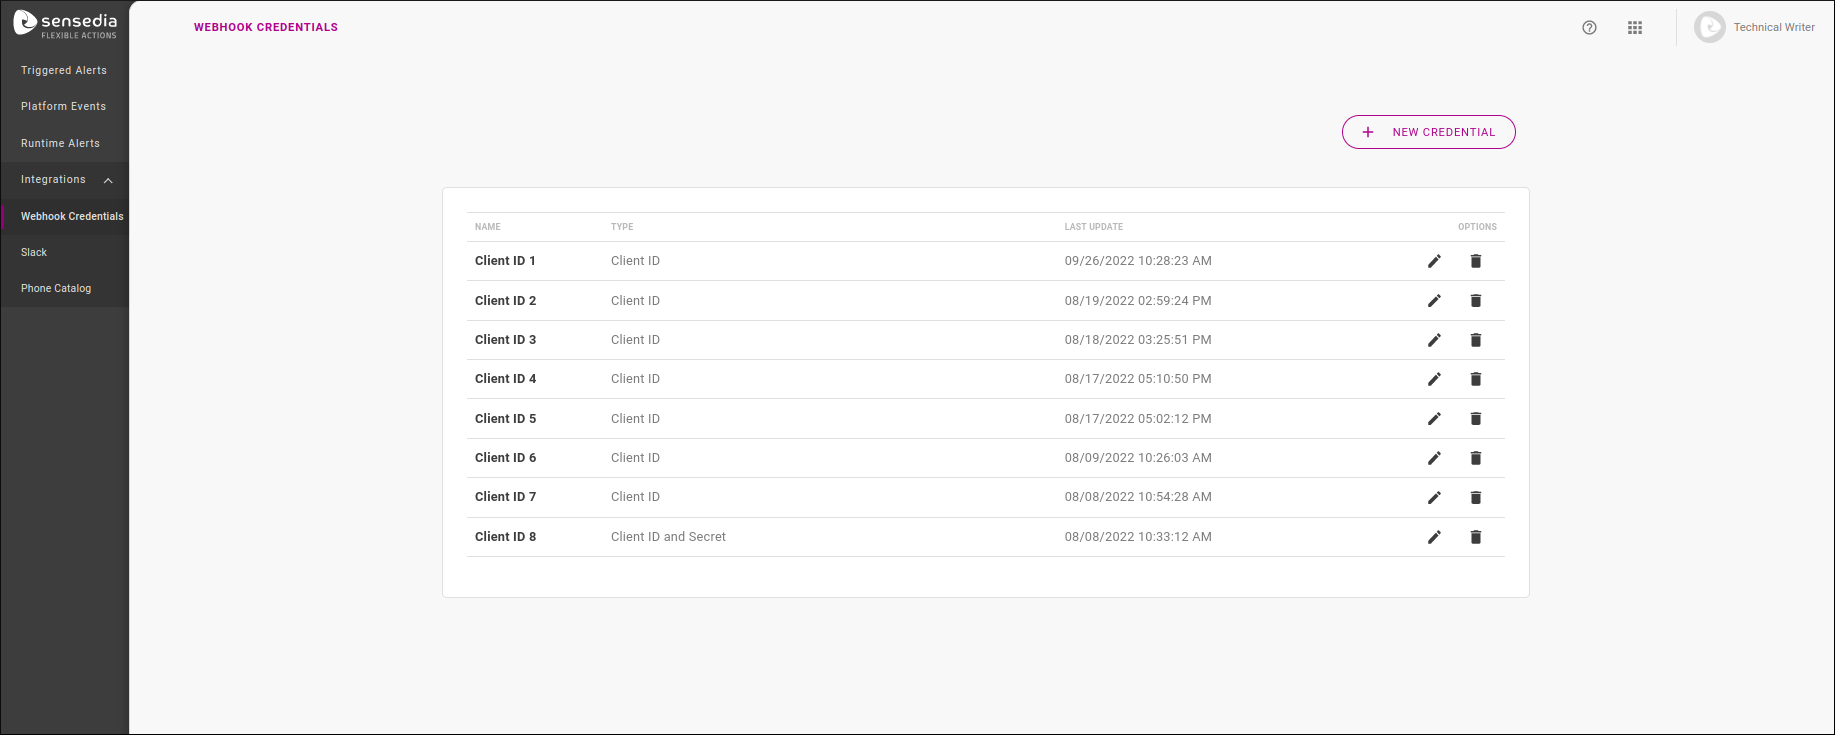
The table displays the name that identifies each credential, its type (whether Client ID or Client ID and Secret) and the date of last update in settings.
In addition, the OPTIONS column contains two icons:
![]() to edit a credential;
to edit a credential;
![]() to delete it.
to delete it.
| You can delete a credential even if it’s being used in an alert’s Webhook settings. In this case, when consulting the alert’s overview screen, its webhook will be displayed as without authentication. |
To create a new credential, click on the + NEW CREDENTIAL button in the upper right corner of the screen.
Enter a name for the credential and choose its type: Client ID or Client ID and Secret.
This will open the other configuration fields, which depend on the type chosen.
| The credential name doesn’t have to be unique, but if you have multiple credentials with the same name, it will be difficult to select the one you want when setting up a webhook for an alert. |
If your credential is of the type Client ID, fill in:
Field Name: name of the field that will be in the request (composing the name/value pair);
Location: location of the information in the request, which can be Header or Query Param;
Value: client ID value, composing the name/value pair.
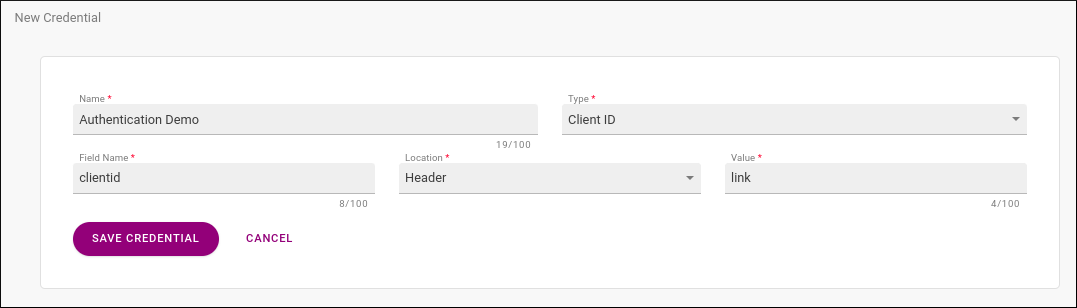
When only the client ID is used, it’s displayed without coding in the request.
Taking the example of the image above, in which the client ID was configured to appear in the headers, the header will contain: clientid: link.
If the same client ID were included as a query param, the request would be POST /?clientid=link.
After saving your credential, it can be used when configuring a webhook on Platform Events and Runtime Alerts.
If your credential is of the type Client ID and Secret, fill in:
Field Name: name of the field that will be in the request (composing the name/value pair);
Location: location of the information in the request, which can be Header or Query Param;
Client ID: client ID value, composing the name/value pair.
Secret: value that will be added to the client ID.
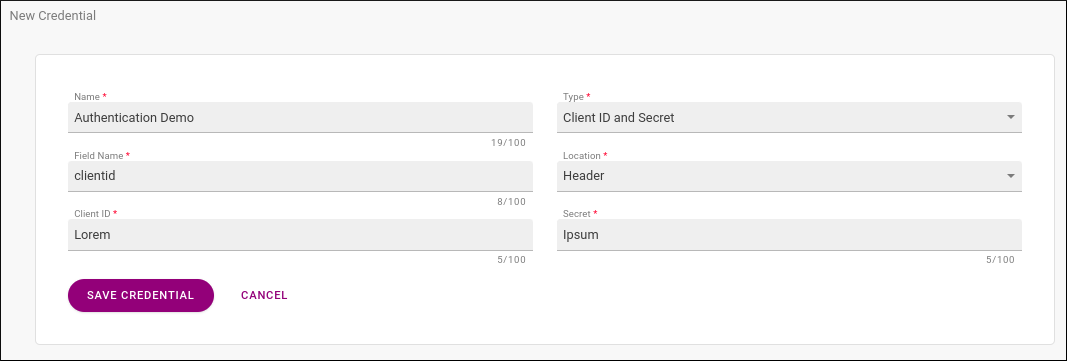
When the client ID is used accompanied by a secret, the value included in the request is composed of both client ID and secret, encoded in Base64.
Taking the example of the image above, in which the value of client ID + secret was registered to be included in the headers, the header will contain: clientid: bGlua2Vwb25h.
If the same client ID were included as a query param, the request would be POST /?clientid=bGlua2Vwb25h.
After saving your credential, it can be used when configuring a webhook on Platform Events and Runtime Alerts.
To edit a credential, click on ![]() under the OPTIONS column of the list of existing credentials, which will lead to a registration screen similar to the one for creating credentials.
under the OPTIONS column of the list of existing credentials, which will lead to a registration screen similar to the one for creating credentials.
You can edit any fields of a credential except its type (Client ID or Client ID and Secret). In this case, you must delete the credential and create a new one.
The tab SLACK () lists the Slack workspaces integrated with Flexible Actions and allows adding new workspaces. Through this integration, Flexible Actions finds the Slack channels that will receive notifications when an alert is triggered.
The user can choose to send notifications to Slack in the ACTIONS step when creating or editing an alert (both in Platform Events and Runtime Alerts). It’s also while creating/editing an alert that the channels are selected.
| See the Slack documentation for information on how to create and manage workspaces. |
The tab lists all integrated workspaces, sorted by date of last update:
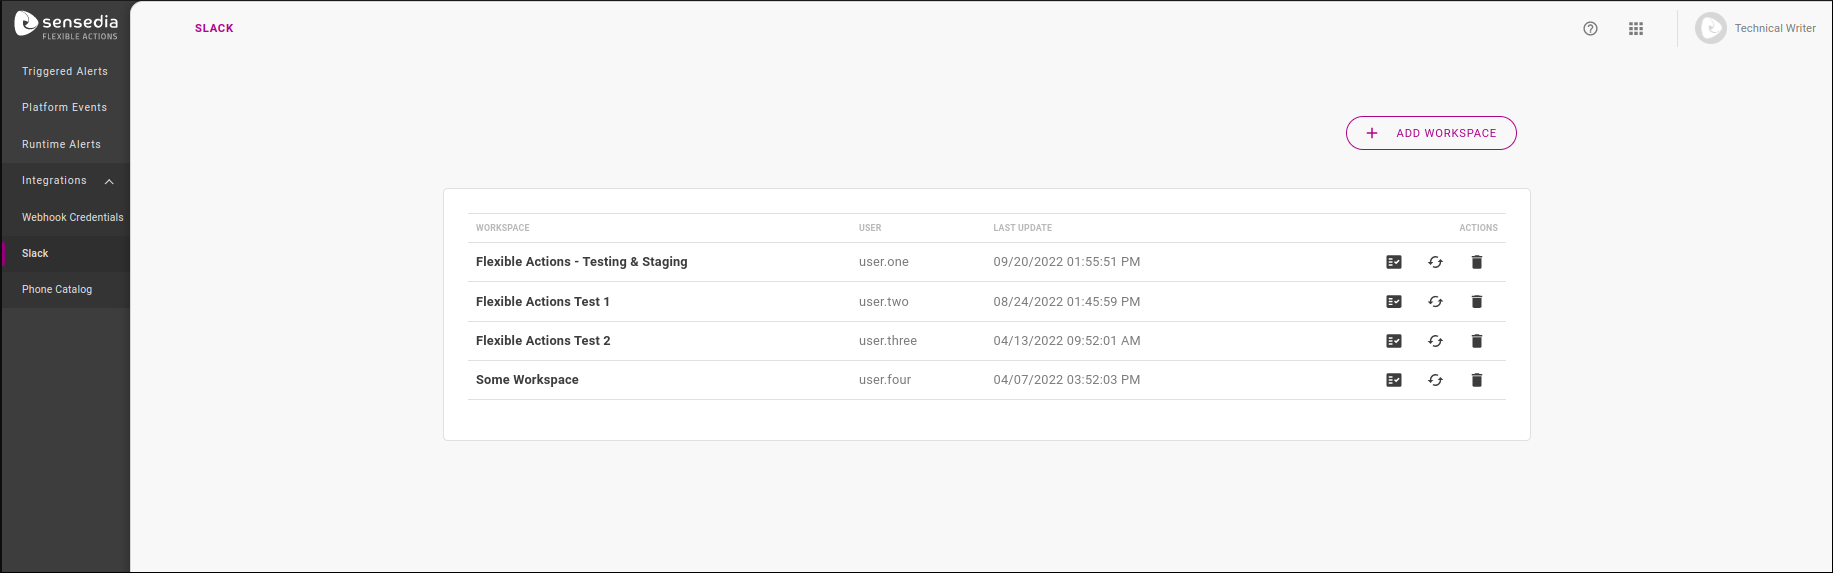
The table displays the workspace name, the user who added it and the date of last update. In addition, the OPTIONS column contains three icons:
![]() — to test the connection to the workspace.
A message on the upper right corner will appear, letting the user know whether the test was successful.
— to test the connection to the workspace.
A message on the upper right corner will appear, letting the user know whether the test was successful.
![]() — to reconnect to the workspace in case there’s any integration problem, without the need to delete the workspace and register it again.
— to reconnect to the workspace in case there’s any integration problem, without the need to delete the workspace and register it again.
![]() — to delete the workspace (see more about it below).
— to delete the workspace (see more about it below).
To include a new workspace, click on the + ADD WORKSPACE button in the upper right corner of the screen. This will open a modal window to grant access permission:
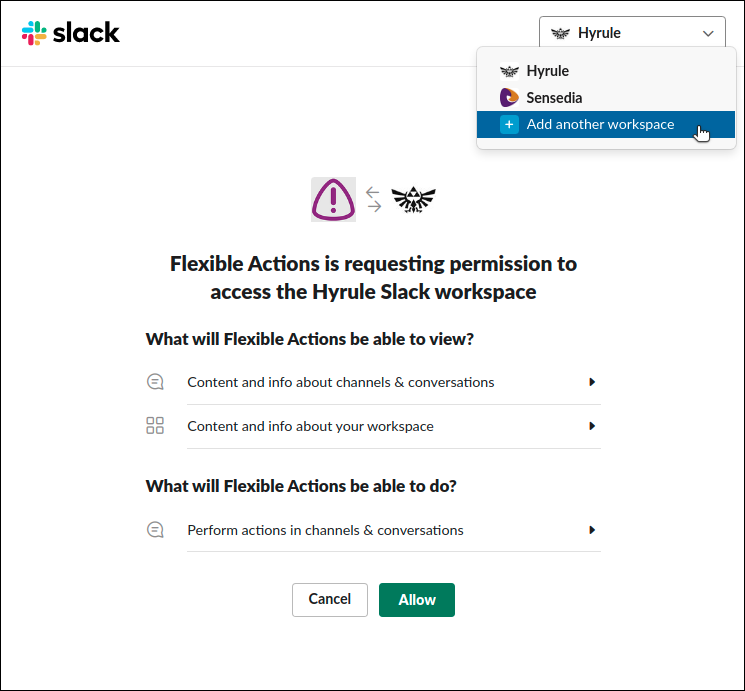
Loaded workspaces will be displayed in the selection field, on the upper right corner of the window. You can load another workspace by clicking the option Add another workspace. After allowing access to the workspace, it will show up on the list of integrated workspaces.
Now, it’s possible to choose this workspace for the sending of notifications, which is done in the process of creating/editing an alert (when you also select the channels the notifications should be sent to).
To remove the integration to a workspace, click the icon ![]() under the OPTIONS column of the list of workspaces.
under the OPTIONS column of the list of workspaces.
You can delete a workspace that is being used by an alert. When this happens, the option Slack is still shown as an action for the alert but its settings will be empty (that is, no channel will be selected for notifications to be sent).
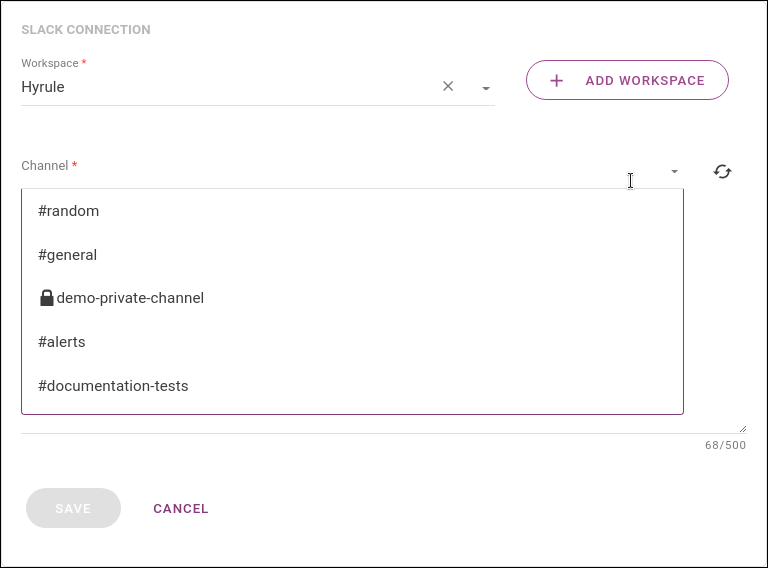
You choose which Slack channels will receive notifications when you create or edit an alert. After selecting the workspace, its channels are loaded and displayed.
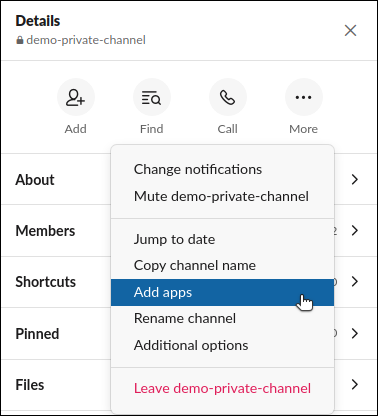
By default, only public channels are loaded, but you can also enable notifications to private channels. This is done on Slack:
Go to the private channel and click the icon ![]() , which opens the channel’s details.
, which opens the channel’s details.
Click on … More and then on Add apps:
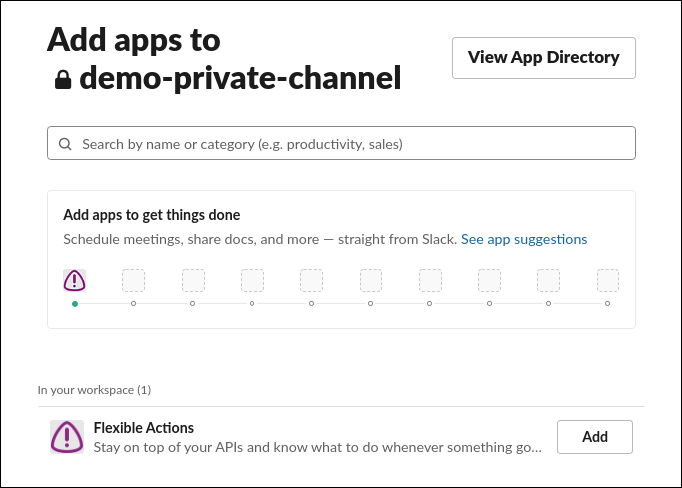
Find Flexible Actions on the list of apps integrated to your workspace and click on Add:
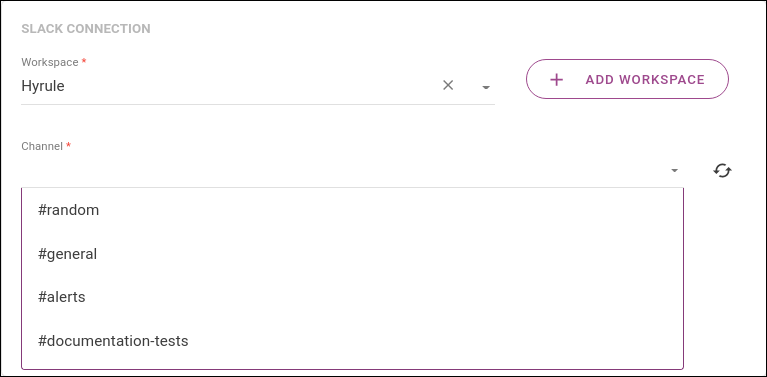
While creating or editing an alert, when configuring the action Slack, update the list of channels by clicking ![]() , next to the field Channel:
, next to the field Channel:
That’s it!
Now the private channel is exhibited on the list of channels and can be selected:
Share your suggestions with us!
Click here and then [+ Submit idea]