Thanks for your feedback!
EDIT
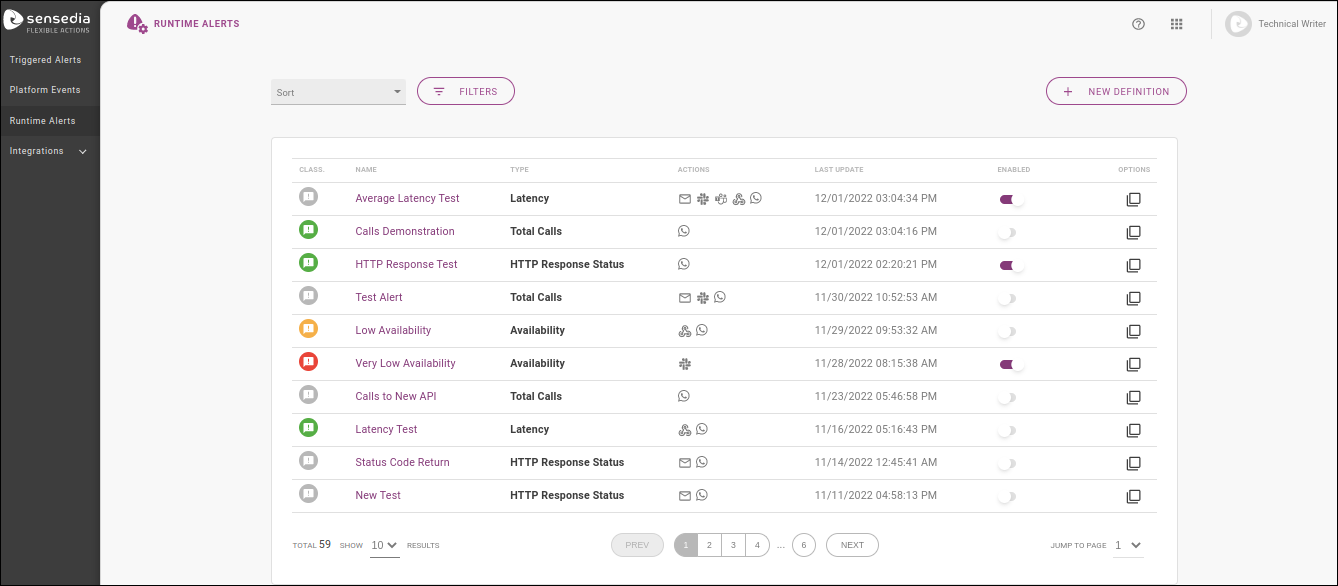
The Runtime Alerts screen shows the list of existing alerts notifying on API performance and allows setting up new alerts.
| See more about the creation of new alerts on the next page. |
The alerts list displays information under these columns:
CLASS, which shows the admonition classification of each alert as an icon.
NAME, with the alert’s name.
TYPE, which is the category of API parameters to be monitored. Options: total calls, availability, latency and HTTP response status.
ACTIONS, including icons that represent the media used to send notifications.
LAST UPDATE, informing the date and time of last update in settings.
ENABLED, which shows a button to easily enable or disable notifications for the alert.
OPTIONS, with the icon ![]() to clone the alert.
to clone the alert.
The list of configured alerts can be sorted in ascending or descending order by date of last update, through the field Sort.
Existing alerts can also be filtered by notification type, admonition classification (neutral, success, warning and critical) and status (enabled or disabled):

Alerts are created with notifications enabled by default. However, you can quickly enable or disable notifications through the buttons under the ENABLED column of the list of alerts. Enabled notifications will have hued icons and disabled notifications will have grey icons:

Alerts with disabled notifications will still be on the list of existing alerts and can be enabled any time.
To make the creation of alerts easier and faster, you can clone any existing alert (with or without enabled notifications) by clicking the ![]() icon under the OPTIONS column of the Runtime Alerts list.
You’ll be taken to the new alert’s configuration screen, where all fields will be filled in with the info of the cloned alert.
icon under the OPTIONS column of the Runtime Alerts list.
You’ll be taken to the new alert’s configuration screen, where all fields will be filled in with the info of the cloned alert.
To render identification easier, the clone’s name will contain the "- Copy" suffix, but you may edit it, as well as modify any other field you wish, before saving your new alert.
| The new alert will be created as if the flow started from scratch. This means that the receiver of the notification will need to accept their subscription through a confirmation email, even if they are the same receiver of the cloned alert. See more about confirming subscriptions here. |
If you click on any column of an alert on the Runtime Alerts page, you are directed to its overview screen:
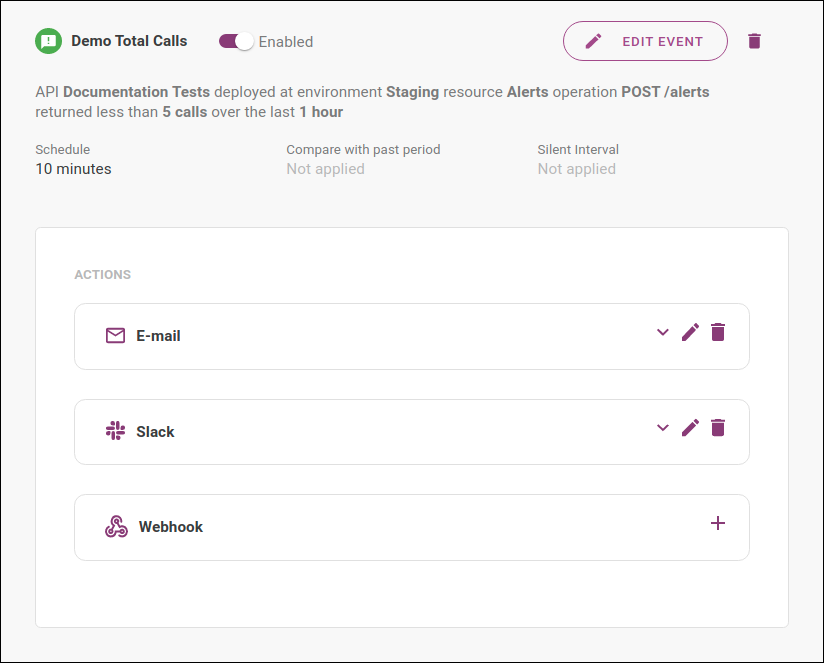
It exhibits the default message sent with triggered notifications and specific data registered:
Schedule: it shows how often the monitored parameters are checked.
Compare with Past Period: if the alert is based on comparison with past performance, it will display the past period chosen.
Silent Interval: if the alert is temporarily silenced, it will show for how long.
| The information above are registered in the process of creating a new alert. You can read more about the creation process here. |
On this screen, you can edit event parameters that trigger the alert by clicking the EDIT EVENT button, delete the alert by clicking ![]() and quickly enable/disable it by clicking the Enabled button.
and quickly enable/disable it by clicking the Enabled button.
The screen also displays the ACTIONS box, which contains the notification channels, with details (icon: ![]() ), options to add an action if it hasn’t been configured (
), options to add an action if it hasn’t been configured (![]() ), edit it (
), edit it (![]() ) or delete it (
) or delete it (![]() ).
).
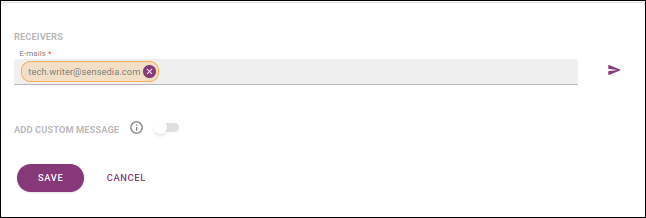
For the action E-mail, you can see registered receivers and the custom message (if one has been included).
If a receiver has not yet authorised the receiving of notifications, you may send a new confirmation email.
To do so, click on ![]() in E-mail and, on the editing screen, click on
in E-mail and, on the editing screen, click on ![]() :
:
To edit an alert’s basic information (that is, the monitoring conditions that trigger notifications), go to the alert’s overview screen by clicking the alert’s row on the list of Runtime Alerts. Then, click the button EDIT EVENT. You’ll be redirected to a page similar to the alert’s registration screen and will be able to make your modifications.
| The only information that can’t be modified is the notification type (i.e., the type of API parameter to be monitored). In this case, you can delete the existing alert and create a new one for the notification type you want. |
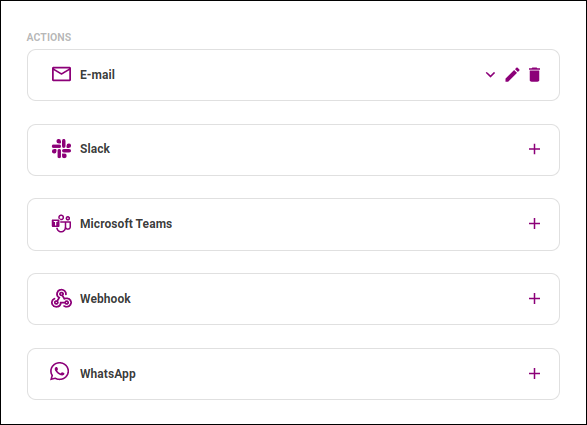
To edit the actions that follow an alert being triggered (that is, the notification channels used), interact with the items in the Actions block, as in this example:
Actions already configured can be edited by clicking ![]() .
.
Actions not yet configured can be added by clicking ![]() .
.
Actions can be deleted by clicking ![]() .
.
|
Every alert must contain at least one notification action.
Therefore, if there’s only one action configured for an alert, there won’t be an icon to delete it: |
To delete an alert, go to the go to the alert’s overview screen by clicking the alert’s row on the list of Runtime Alerts.
Then, click the icon ![]() .
.
| When you delete an alert, it’s removed from the list of existing alerts. If you wish to only disable notifications temporarily instead of removing an alert for good, you can use the buttons under the ENABLED column of the Runtime Alerts list. A disabled alert will remain in the list and may be enabled again at any moment. |
Share your suggestions with us!
Click here and then [+ Submit idea]