Thanks for your feedback!
EDIT
The AUTHENTICATION tab allows configuring authentication rules for a service.

| You can configure the authentication on the interface of Sensedia Service Mesh or using the command line (by applying a .yaml file). But even if you use the command line, you’ll be able to see and edit the configuration on the interface. |
The actions you can perform on this screen depend on the permissions set for your user in Sensedia Access Control.
The following table shows the possible permissions and the corresponding actions:
| Permission | Description |
|---|---|
List Api Authentications |
It allows the view of the basic information of an authentication setting in the table of the AUTHENTICATION tab. |
Read Api Authentications |
It allows the view of the details of an authentication setting created for a service. |
Write Api Authentications |
It allows creating, editing, and deleting authentication settings for the services. |
To start, click the button CONFIGURE AUTHENTICATION and fill in these fields:
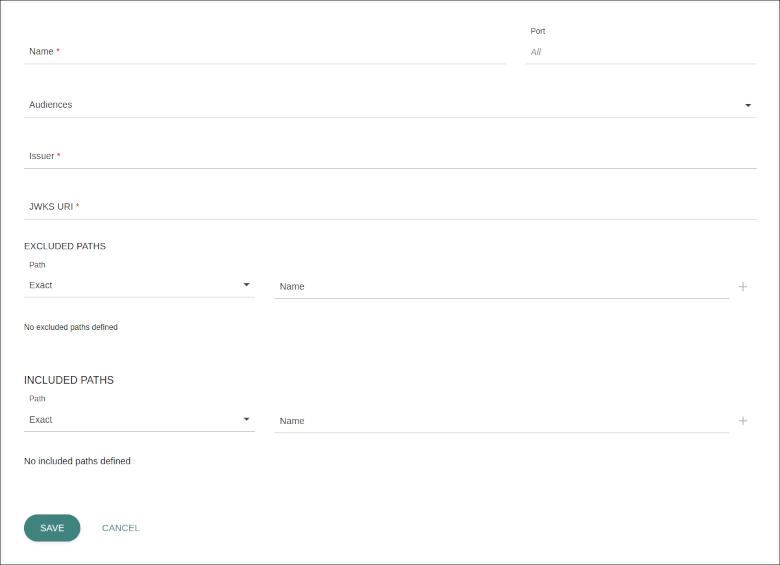
Name: identifying name for the configuration.
Port: port that exposes the service in Kubernetes.
Audiences: non-required field to insert the audience, that is, the recipient of the authentication token.
Issuer: inform the address of the OpenID provider used.
JKWS URI: inform the path of the JSON Web Key Set encryption used to sign the JWT tokens.
You can customise the paths that will require or waive authentication for each service in the sections EXCLUDED PATHS and INCLUDED PATHS.
To add paths that will need no authentication (Excluded Paths), choose the type of path, which can be Exact or Prefix, and a name.
If you choose the type Exact, the very path you insert will not require authentication to be accessed, but sub-paths will.
For example, if /api is set as Exact Path, it won’t require authentication but /api/orders will.
In turn, if /api is set as Prefix, all its sub-domains, including /api/orders, will not require authentication.
|
To insert paths that will require authentication (Included Paths), choose the type of path, which can be Exact or Prefix, and a name. The same rules about sub-domains described above apply.
|
There are some behaviours to keep in mind here. If no path is added to the sections EXCLUDED PATHS and INCLUDED PATHS, all the service’s endpoints will require authentication. Why, then, should we add Included Paths and not only Excluded Paths, in case you wish to disable authentication for a specific path? The idea is to make customisation simpler.
If, for example, you wish to disable authentication for all endpoints that start with Once you do that, |
You can insert as many paths as you want in both fields by clicking the icon +.
If authentication has already been configured, it will be displayed on the screen.

To edit it, click the icon ![]() .
This will open a window with all configured information for you to modify what you need.
The only field that can’t be edited is the name.
.
This will open a window with all configured information for you to modify what you need.
The only field that can’t be edited is the name.
It’s also possible to delete the configuration altogether (and you can set a new configuration whenever you desire).
To do that, click the icon ![]() .
.
Share your suggestions with us!
Click here and then [+ Submit idea]